

How To Make A Slideshow Windows 10
In her previous posts, Selin Tagmat of Heed Your Photos has blogged about the nuts of creating compelling slideshows, specially for Mac users. This week, she is back with another smashing post on this topic for those who love their PCs!If you are looking to create a basic photo and video slideshow in Windows, requite Microsoft Photos a try! Information technology's a native app that comes with the operating system for free!
Did You Know You Can Create Slideshows in Microsoft Photos?
Did you know that Microsoft Photos offers a slideshow feature? That's right, last year Microsoft decided to discontinue Windows Movie Maker and instead introduce a new video editing feature inMicrosoft Photos. Although I commonly use more advanced video editing tools for my slideshows, I like to stay on top of new updates and attempt out new features, and so I know exactly what my native apps offer. I can say that t he video editor in this app is non a replacement for Windows Movie Maker, but it does offer bones video editing possibilities, so i f yous want to create a simple slideshow with photos, videos, music, text and effects, it'south certainly worth a try.
Here's how to create a slideshow with Microsoft Photos in 10 uncomplicated steps:
Step #1 – Prep Your Slideshow
As for any slideshow, the beginning step is to decide on the concept, outline and content. If you haven't done then, I advise y'all to have a wait at my previous blog mail service ; information technology has some keen tips to keep in mind when creating preparing a nice slideshow.
For this tutorial, I will create a slideshow to share photos and videos from a fun weekend trip. Commencement, I selected around 45 photos and 3 videos for this slideshow, which I expect to be effectually three minutes long. Then, I saved everything in a dedicated folder and put it in society, set to exist imported into Microsoft Photos (see below).
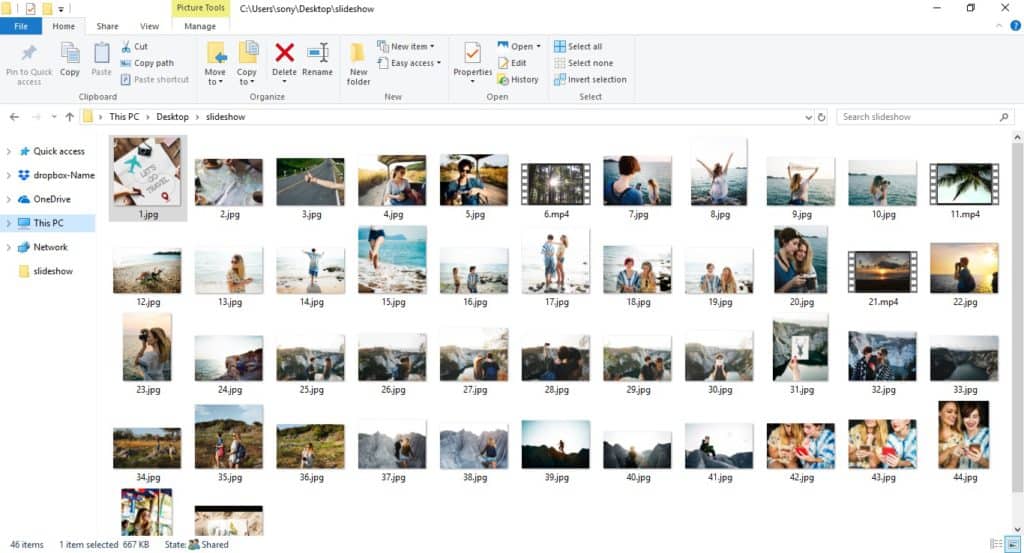
All slideshow content is saved in a dedicated binder, and arranged in the social club based on the slideshow outline. Thanks to rawpixel for the photos and pexels for the videos!
Step #2 – Create a New Video Project
When you open the Microsoft Photos app, yous will run across the photo management interface organized with eitherDrove, Albums, People, and Folders, or (if y'all take the nearly updated version) Drove, Creations, and Folders.
- Drove includes all your media organized past date.
- Albums / Creations shows your albums and video projects.
- People helps you to tag and organize photos accordingly.
- Folders shows media in a folder structure.
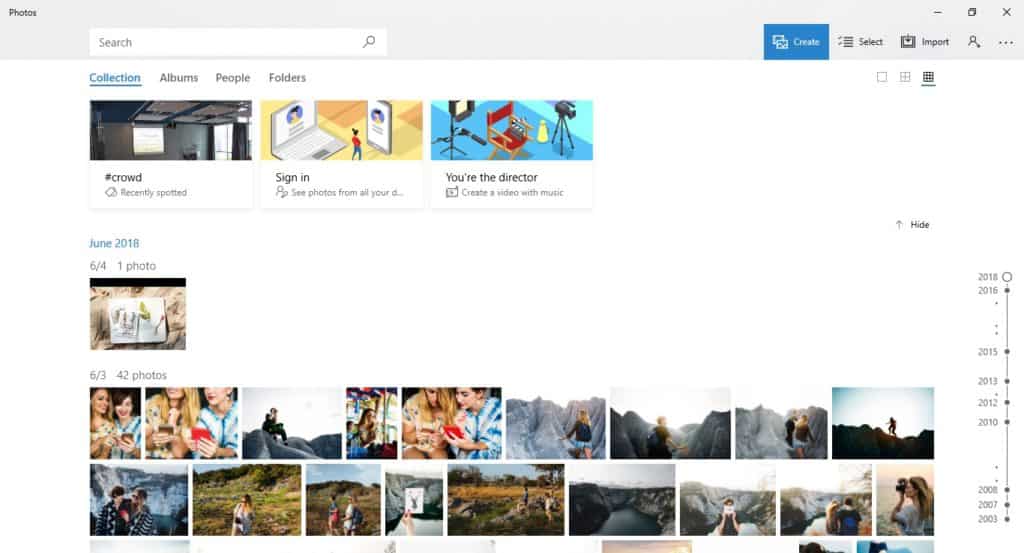
This is the showtime screen y'all volition meet when you open theMicrosoft Photos app.
For video editing features, you lot should click on Create, which offers three options: Automatic video with music, Custom video with music, and Album. With the recent update, this menu has been replaced with Video Remix, Video projects and Album, so which carte you encounter depends on your version of the app.
- Automated video / Video remix: Y'all select photos and videos, while the app arranges the content with a theme, effects and background music. Y'all tin edit it afterwards.
- Custom video / Video projects: You import your photos and videos, accommodate the gild and duration of each item, and add together music and effects yourself.
- Album: This is available to organize your photos and videos into different albums.
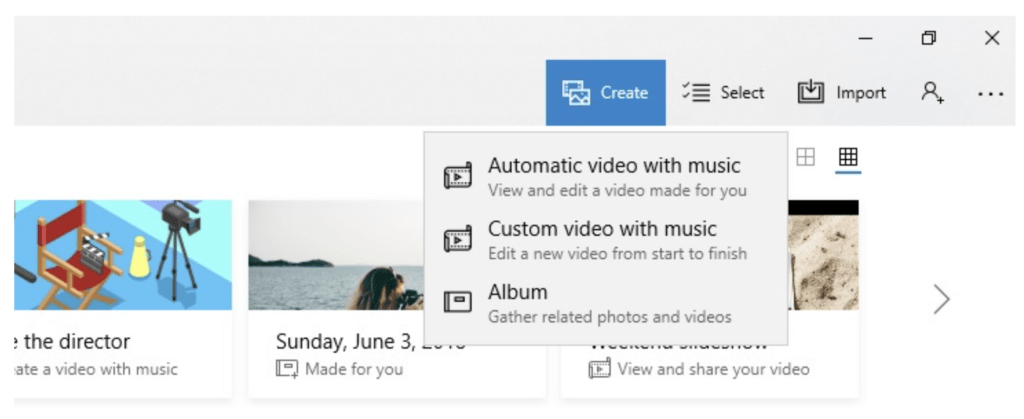
Click on "Create" and select "Custom video" to get-go creating your slideshow.
For this tutorial, I volition create a custom video projection to be able to bear witness you all the features offered by the app. From my Microsoft Photos experience then far, it's easier to create a video project from scratch and to customize it according to my choices, rather than try to conform and fix an automatically created video. Unfortunately, the automatic organization isn't expert plenty to make my life easier and my slideshow nicer.
Step #3 – Import Your Photos and Videos
In one case you select theCustom video / Video projects option, theMicrosoft Photos app will ask yous to select what you'd like to add. That's when yous upload the photos and videos from the dedicated slideshow binder.
Go to Folders and click on Add together a binder. One time y'all notice and add your slideshow content binder here, you'll see it nether Folders from now on. Hither, mine is named Weekend Slideshow.
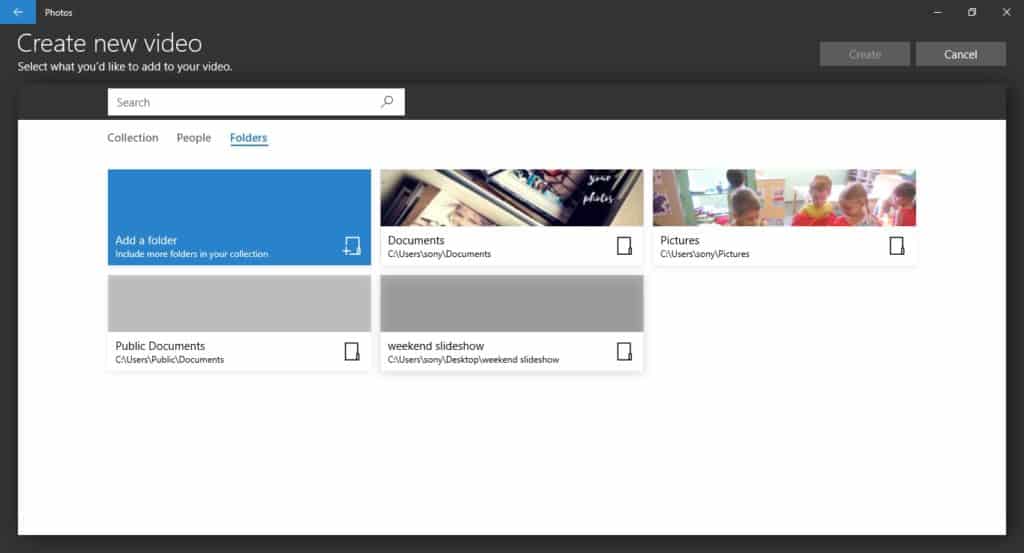
Add together your content binder to the project.
When yous are in Folders, click on the folder where you lot have the slideshow content. Select all the photos and videos you want to include in your slideshow and click on Create. So you will see a blue screen telling yous that the app is creating a video from the selected items.
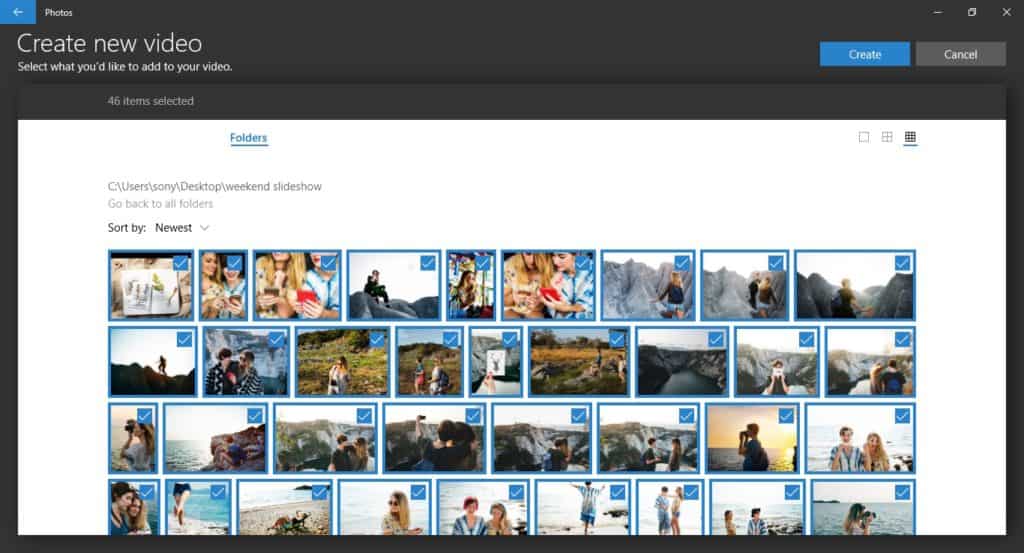
Microsoft Photos creates a new video from your content folder when you click Create.
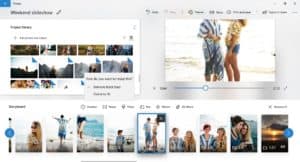
Once the app creates your video, you will see a new screen with a Project library on the acme left, Storyboard at the bottom, and Preview on the top right. The app volition immediately ask you to name your video.
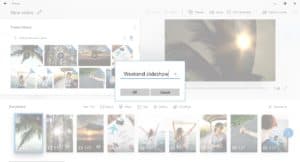
Proper name your new slideshow!
From now on, you don't need to save your project as the app volition automatically save it for you throughout your editing process. If you want to get out your video project and keep later, no problem, you lot tin can e'er find your video project under Albums.
Step #four – Set Your Moving-picture show Aspect Ratio
The [picture aspect ratio defines the shape of the video display. The Microsoft Photos video editor offers three picture aspect ratios to select from with "width:height" format:
- iv:3 (standard Boob tube format)
- 16:9 (widescreen TV format)
- Portrait (handy for social media shares)
For this tutorial, I selected the widescreen Television receiver format.
Yous can adjust the motion picture aspect ratio of your video from the elevation menu of the preview window.
Pace #5 – Arrange Photos and Videos
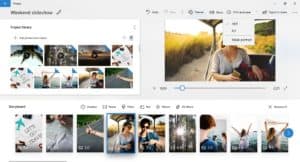
In one case you lot add together your photos and videos, bank check to run into if your storyboard is in good order. TheMicrosoft Photos app adds your content to the video projection in chronological order – newest to oldest, or oldest to newest. If you have sorted your content based on the file proper noun in your defended folder, then your gild will be mixed up here. You lot'll need to do a little manual work by dragging and dropping your photos and videos from 1 point to another on your storyboard.

The Microsoft Photos app automatically adds your content to the storyboard with chronological guild. Check if everything is in the right order, especially if your binder was arranged based on file names.
Desire to go rid of a photo or video? Simply correct click and select Remove it.
Desire to add new content? Go to Project library and click on Add photos and videos. Add new content to theProject library. Then elevate and driblet the new content from theProject library to the Storyboard.

I'grand a Perfect Pinnable!
Stride #6 – Edit your photos
There is merely a few smaller editing functions available in Microsoft Photos, so if y'all need more, I propose you edit your photos and videos according to your usual workflow earlier starting the video cosmos procedure.

One time you click on a photo on your Storyboard, you will meet six editing options: Elapsing, Resize, Text, Filters, Move, and 3D effects.
Here are the editing features you tin can expect to see in the Photos app:
Elapsing
When you upload your photos and videos, Microsoft Photos will automatically decide on their duration. To exist able to synchronize your music with the content and do some fine-tuning for the catamenia of your slideshow, you lot'll need to suit the duration of your photos manually. Click on Duration and either select a timing from the bachelor menu, or add number of seconds manually. You can't select multiple photos and suit their duration with a single click; the app doesn't offer that feature at this time. Instead, you have to arrange photos and videos one-past-i.
Endeavour adjusting the duration of your content manually!
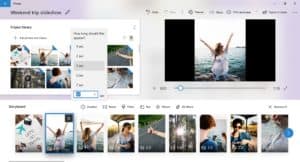
Resize
Click on Resize. Information technology's by default in the Shrink to fit way, which scales down your photo or video to fit the screen size you selected, all the while preserving the aspect ratio of your original content. Equally a outcome, yous encounter two black bars on the sides. If yous select Remove black confined, the app will crop your photo or video in such a way that y'all will not see black confined anymore. This achieves a more professional await. Nevertheless, note that you tin can't adjust which part of your photo volition remain on screen when y'all remove the black bars, so occasionally the end effect is undesirable because it doesn't encompass a meaningful portion of the photo. In instance this happens, you lot'll either need to leave the black confined intact, manually crop your photo to take the right size for your screen, or drop that photo from the composition birthday.
Decide how you want to handle sizing issues!
Text
When you click on Text, you'll be able to add text to your photo, with different animated text styles and layout options.
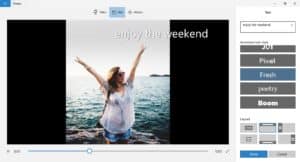
Y'all can add text to your photo or video.
Filters
Click on Filter to be able to choose from a variety of filters. Y'all don't have to employ one if your content is fine the way information technology is, but information technology'southward helpful if you lot want to accommodate color rest or saturation with i click.
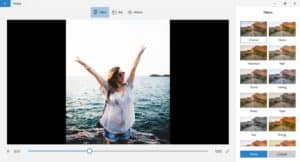
Employ filters sparingly!
Movement
When you lot select Motion, you'll encounter some basic panning and zooming options to add some motility to your stills. In more than advanced video editing tools, you would select where to start and end this effect on your photos, and so you'd have more control on the position and timing. In Microsoft Photos, however, you lot select the consequence and it's automatically applied by the video editor in a default way.
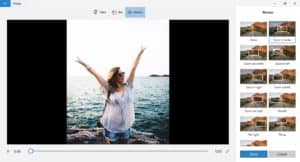
You can add together movement to stills on a basic level!
3D Effects
The video editor also has some 3D effects and objects that can be used for your slideshow. I would suggest not using these unless yous have the intention of creating a more informal story. Prissy and elegant looking slideshows usually take a cleaner look.

Select 3D effects and and then Effects, and you'll run into several effects that you lot can add to your photos or slides.

If y'all select 3D effects and so 3D library, you'll discover a multifariousness of 3D objects that yous tin insert onto your photo slides.
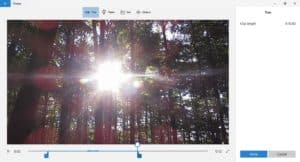
Step #7 – Editing Videos
Once you lot click on a video on your Storyboard, yous'll run across similar editing options as those for your photos, except that Duration is replaced with Trim.

Once you click on a video on your Storyboard, you'll see the bachelor editing options for videos.
Trim
When you click on Trim, a new screen will appeari with two slides on your video timeline. You lot just need to select the portion of the video you want to go along past moving the sliders left or right. Y'all tin meet the trimmed video length at top right. In all editing modes, don't forget to clickDone once you take adapted your settings.
Step #8 – Import Music
Yous music choice is very important. It's one of the main aspects that will aid you to connect emotionally with your audience. In other words, the incorrect music can spoil the show. If you aren't sure how to make your choice for the right type of music (something that matches the style and length of your slideshow and that is royalty free), have a await at the tips in my previous blog post .
Click on Music (summit right menu of the Microsoft Photos app), go to Your music and select your own music file to add it to your slideshow. You tin can also find a selection of built-in music offered by the app under the Recommended tab. For this tutorial, I selected and downloaded a fast music by audionautix.com ("Latin Business firm Bed") with bright and uplifting tunes to friction match with the weekend fun effect.
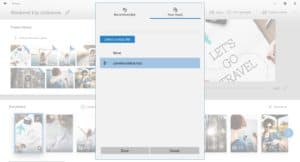
Import your own music or select something from the library!
Footstep #ix – Synchronize Everything
If you select music from the built-in library, the app offers you lot the choice to automatically sync your video to that music's beat.
On the other hand, if yous import your ain music, you'll need to work on synchronizing the music and content manually. To be able to handle this in a applied and quick manner, play your slideshow background music and place the intervals of strong beats – basically where yous would desire to take your transition betwixt photos and videos.
In my case, the best duration looked like 3 seconds for each photo and the multiple of 3 seconds for videos. I adjusted the duration of everything manually, previewed the whole slideshow to be certain that everything matched well, and did some small fine-tuning of durations where necessary.
Step #ten – Export and Share
Finished with your video editing? Click on theExport or share button to export your video and pick from the three possible options:
- Small-scale (for email and small screens)
- Medium (for sharing online)
- Large (for large screens)
When your video is set, it will be saved as an mp4 format in your Pictures folder under Exported videos. On the side by side screen, you' ll have sharing options for Mail service, Skype, YouTube, and OneNote.
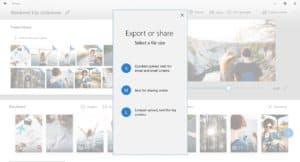
Consign or share your video with family and friends!
The Finished Slideshow
Hither you go! You lot tin can now sentry the photograph and video slideshow that I created with the Microsoft Photos app. Savor!
Weekend trip slideshow from Mind your Photos on Vimeo.
Beginner? Try It & Evaluate!
If y'all are already used to more advanced video editing tools, this app will be far from satisfying. In comparison to advanced tools, this app is non flexible enough, adjustments are often manual and time-consuming, and features are limited. In short, achieving a completely professional-looking slideshow with a perfect match of music, effects and transitions will be difficult. That being said, it will do the job without much of a learning curve, for costless, and without the hassle of looking for other apps. If y'all want to have a wait at what makes a difference between slideshow created with a more powerful video editing tool, you can take a glance at the slideshow I created with iMovie for Mac in my previous blog postal service .
I promise this tutorial volition help to those of y'all who were curious virtually how to create a simple photo and video slideshow in Windows. Stay tuned to learn about further video editing tools and tips to create nice slideshows on various devices – your computers, laptops, phones, tablets and akin!
What say you, readers? Accept you lot tried creating slideshows with Microsoft Photos? Let us know in the comments!
Featured Photo Courtesy of Selin Tagmat


Source: https://www.organizingphotos.net/photo-video-slideshow-windows-microsoft-photos/
Posted by: mosbyquet1991.blogspot.com
0 Response to "How To Make A Slideshow Windows 10"
Post a Comment